Pinterest's built-in scheduler holds a maximum of 10 pins. That fills up fast when you're trying to post every day.
The fix is a Google Sheet connected to Pinterest via Make.com. You add pin ideas to a spreadsheet. Make.com checks it on schedule and posts one pin automatically. That is how to schedule pins on Pinterest without hitting the native limit.
No WordPress required. This works for any content creator, blog or no blog. If you can use a spreadsheet, you can run this.
Not sure which approach fits your situation? The overview of Pinterest automatic tools compares every option, from free built-in options to full Make.com workflows.
How Pinterest's Native Scheduler Works (And Why It's Not Enough)
What the Native Scheduler Can Do for Free
Pinterest's built-in scheduler is free with a Business account. If you do not have one yet, converting takes under two minutes at business.pinterest.com. No existing content gets lost.
Once you have a Business account, you can schedule up to 10 pins at a time. Each pin can be planned up to 30 days in advance. After scheduling, you can still edit the publish date, time, board, title, description, and destination link.
One thing you cannot change after scheduling: the image or video itself. To swap the visual, you need to delete the pin and start over.
For occasional use, this works fine. You plan a handful of pins, they go out, done. The problem starts when you want to post consistently every single day.
The Bulk CSV Upload: 200 Pins at Once - Still Manual
Pinterest also allows bulk scheduling via a CSV file upload. You can queue up to 200 pins at once, for free, via Account Settings, then Import content, then Upload .csv file. Desktop only — this is not available on mobile.
Your CSV needs three columns to work: Title, Media URL, and Pinterest board. You can also add Description, Link, Keywords, and a Publish date. Use the format YYYY-MM-DD for a date, or YYYY-MM-DDTHH:MM:SS in UTC if you want a specific time.
Here is the catch. The CSV upload is a one-time manual action. There is no status tracking, no automatic drip, no way to mark rows as done. When the batch runs out, you build a new file and upload again from scratch.
For a monthly batch upload, that is manageable. The moment you want a self-managing queue that keeps running without your input, it falls apart.
Why the Native Scheduler Breaks Down for Consistent Bloggers
Post two pins per day and that 10-pin queue is gone in five days. Pinterest does not refill it automatically. When it is empty, nothing posts.
The core problem with manual Pinterest posting, including using the native scheduler as a daily routine, is that it breaks the moment you miss a day.
A Google Sheet connected to Make.com solves this differently. Each row is one pin. Once a row is processed, the next one is ready. The queue does not run dry because you keep adding rows at your own pace.
What You Need Before You Start (Checklist)
Pinterest Business Account
A Business account is required for both the native scheduler and the Make.com OAuth connection. Converting your personal account is free and takes under two minutes at business.pinterest.com. No existing pins, boards, or followers are affected by the switch.
Google Account + Google Sheets
No special setup needed here. Google Sheets is free with any Google account. You can use the FlowRunAI Sheets template that comes with the product, or build your own using the column structure covered in the next section.
Make.com — The Automation Layer
Make.com is what connects your Google Sheet to Pinterest. It handles the scheduling, triggers the automation, and posts the pin.
The Pinterest connection uses Make.com's own pre-approved integration. You log in via a standard OAuth screen. No developer account, no Pinterest API review, no approval process.
The free plan includes 1,000 operations per month. A daily pinning setup with 6 to 8 modules per run uses roughly 180 to 240 operations per month. That sits well within the free tier for most users.
The free plan has a 15-minute minimum interval between runs. For a daily trigger, that is irrelevant. If you run multiple active scenarios or need higher volume, the Core plan is around $9 per month.
What "Direct Public URL" Actually Means for Pin Images
Pinterest requires a publicly accessible URL ending in .png, .jpg, or .mp4. The URL must point directly to the file itself, not a preview page.
Google Drive "anyone with link" shares do not work. They return an HTML preview page, not the image file. Dropbox preview links fail for the same reason.
What works: CDN URLs, website media URLs, and Cloudinary public URLs all deliver the file directly.
The simpler option is to let the automation generate the image for you. The Make.com setup creates a vertical 2:3 Pinterest image via OpenAI and passes it directly to Pinterest. No manual hosting needed.
Do You Need to Know How to Code?
No. Make.com is fully visual. There is no code, no developer account, and no Pinterest API review involved. Connecting Pinterest takes about 30 seconds via a standard OAuth login.
The only manual step is filling in your spreadsheet rows. If you publish on WordPress, there is a separate workflow for auto-posting from WordPress directly, no spreadsheet needed.
What Does This Actually Cost?
| Tool | Cost | Notes |
|---|---|---|
| Pinterest Business account | Free | Required for scheduling and API access |
| Google Sheets | Free | Requires a Google account |
| Make.com free plan | Free | Sufficient for daily pinning |
| OpenAI API | ~$0.05 per pin | Subject to OpenAI pricing |
| FlowRunAI blueprint | $29 one-time | Optional — includes blueprint, template, and setup guide |
If you'd rather skip the build entirely, the Sheets to Pinterest AI Auto-Poster includes the ready-to-import Make.com blueprint, Google Sheets template, and step-by-step setup guide. One-time $29, no recurring fees.
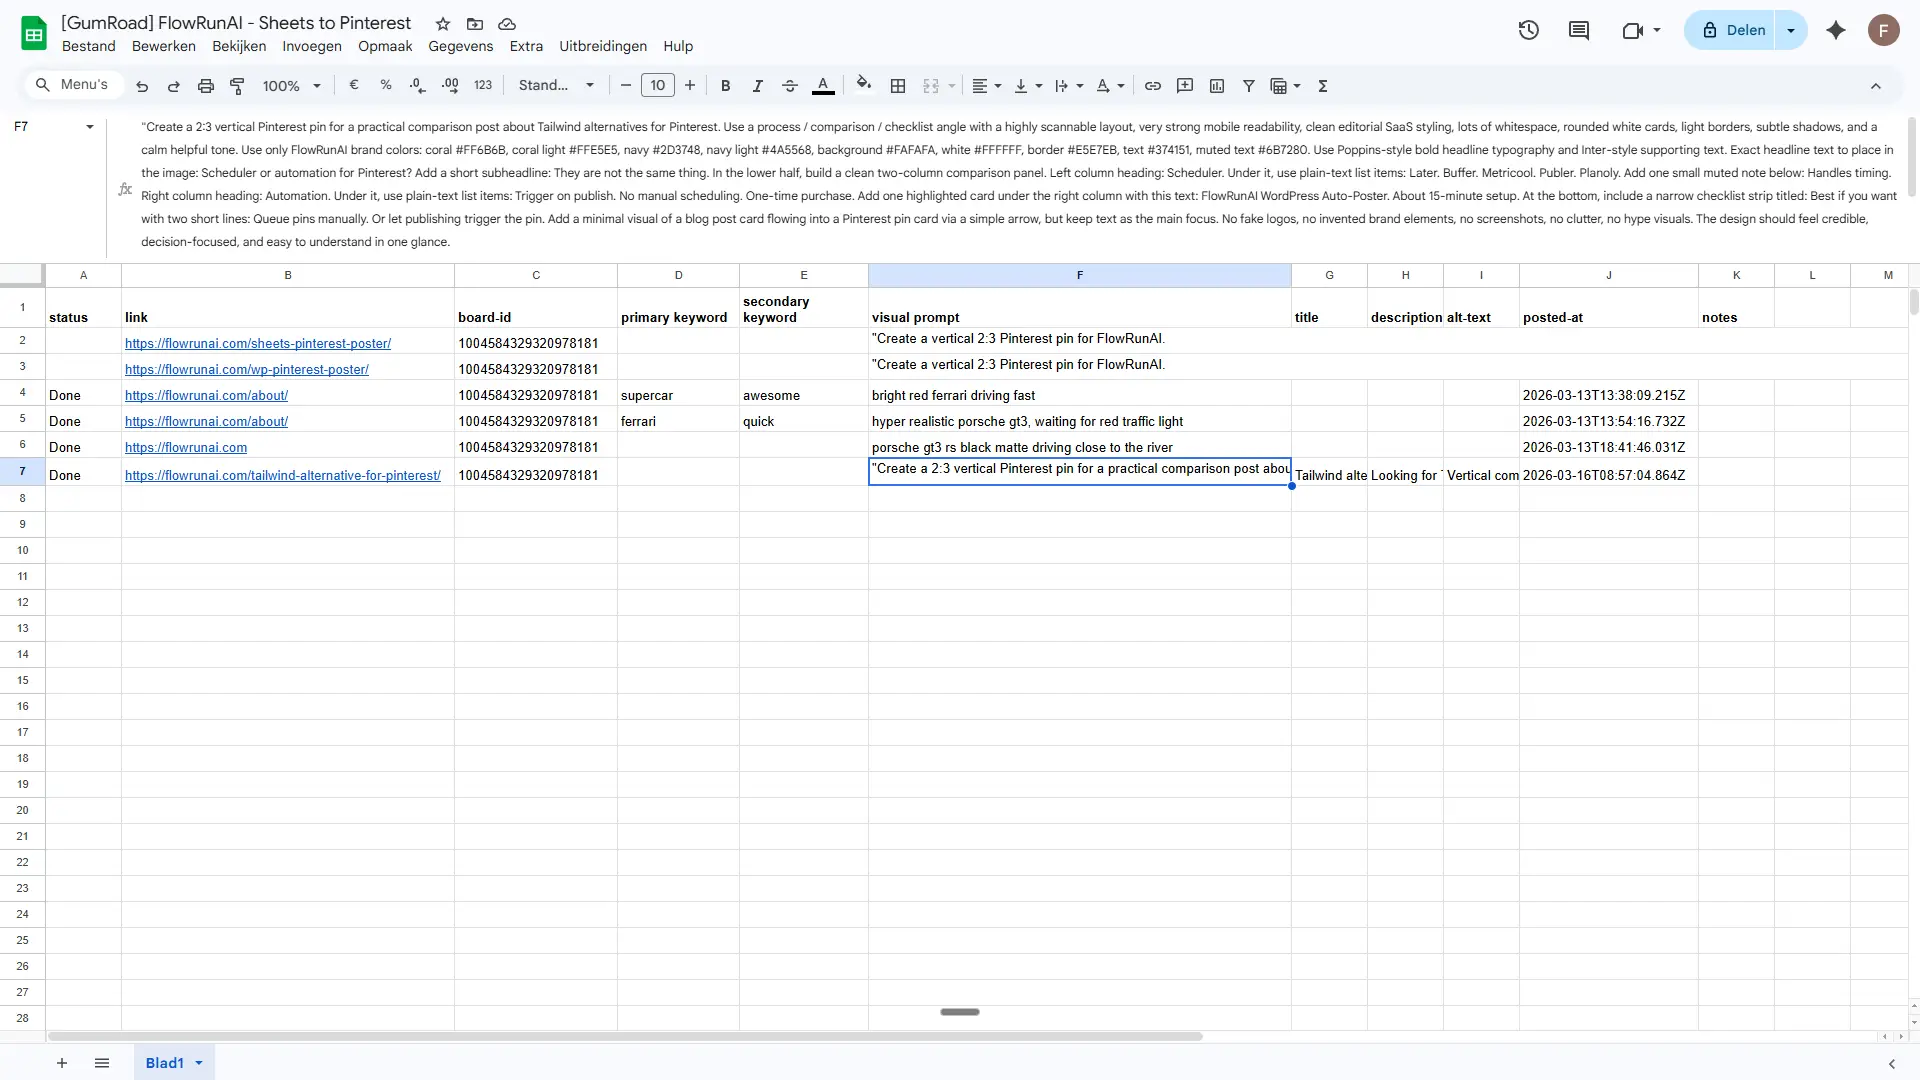
How to Set Up Your Pinterest Pin Queue in Google Sheets
The Columns Your Spreadsheet Needs
Your sheet acts as the automation's source of truth. Each row is one pin. Make.com reads the row, builds the pin, posts it, and marks it done. These are the columns you need, in order:
| Column | Notes |
|---|---|
| status | Controls which rows get processed. Blank = ready, Done = skip, Error = failed. |
| link | The destination URL Pinterest links to when someone clicks the pin. |
| board-id | The Pinterest Board ID of the board where the pin gets published — store as plain text. |
| primary keyword | Main keyword used by AI to write the pin title and description. |
| secondary keyword | Supporting keyword for SEO variety in the description. |
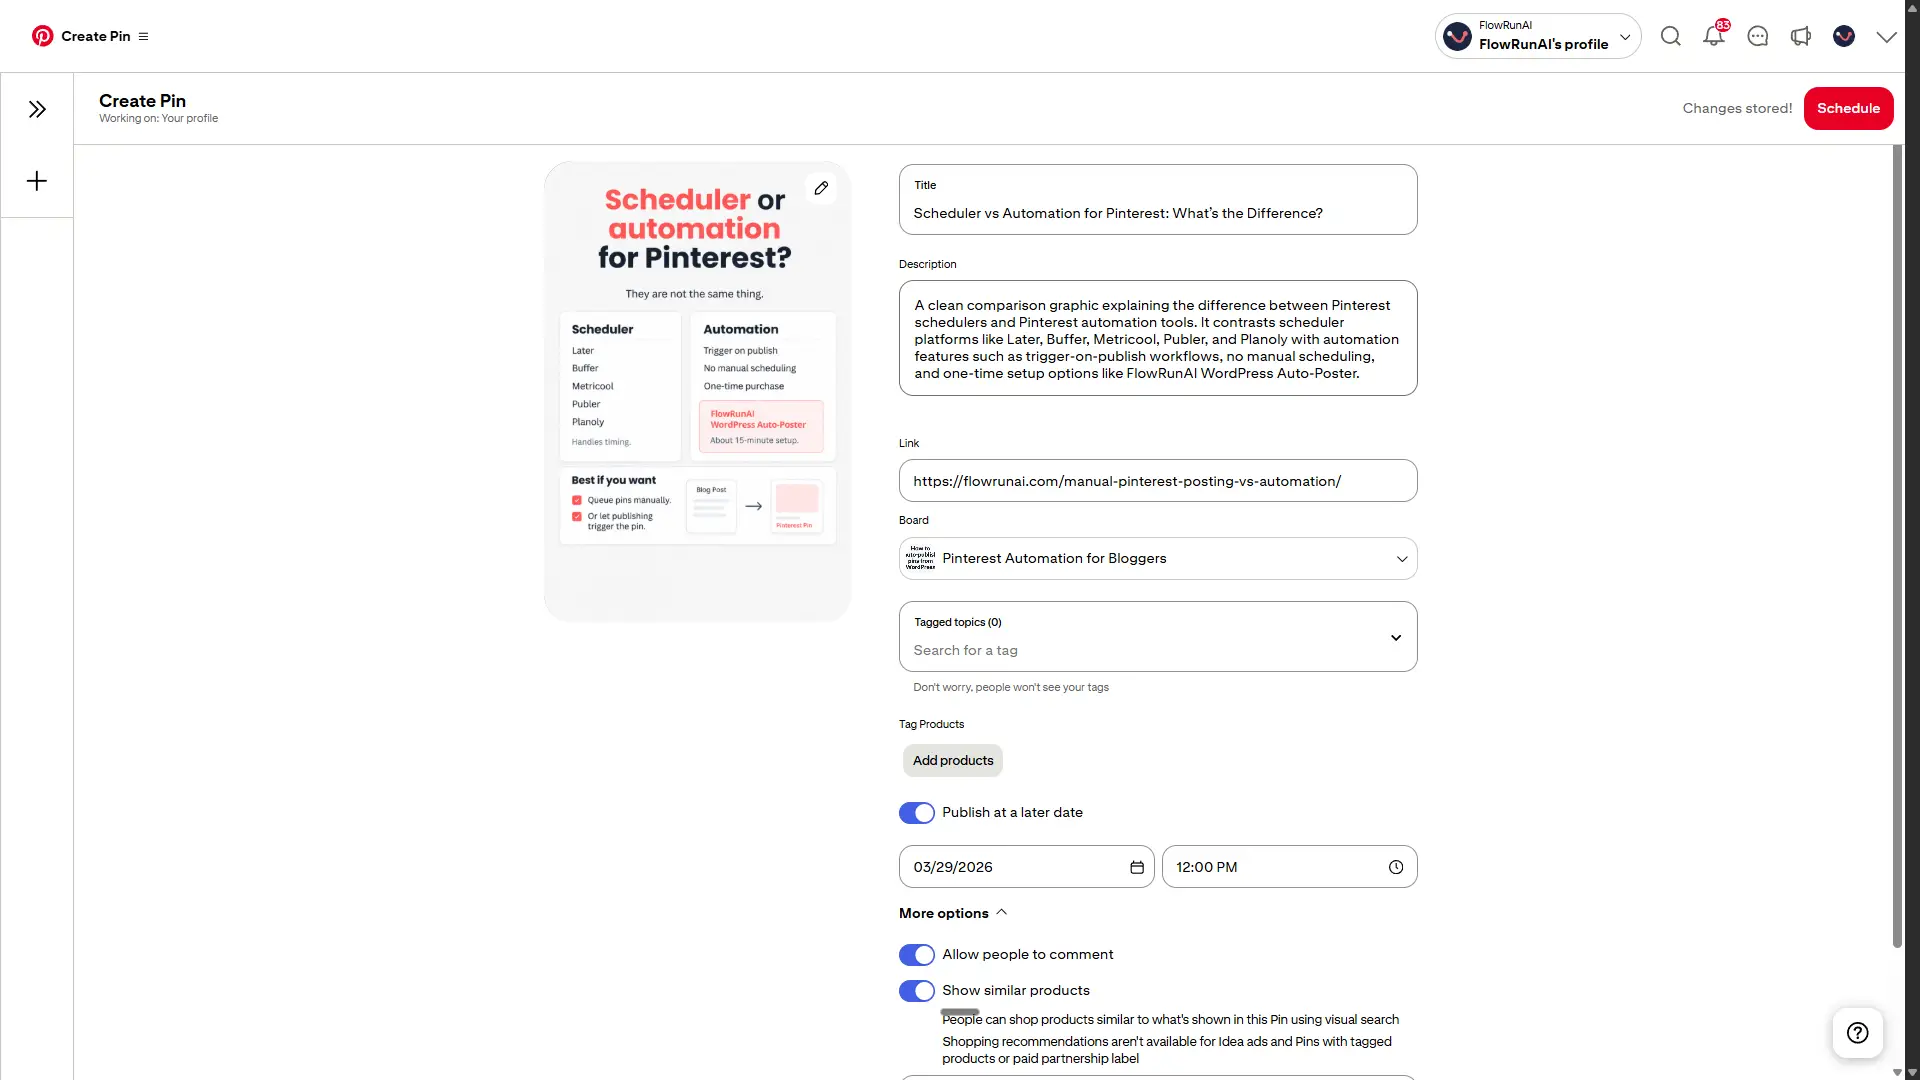
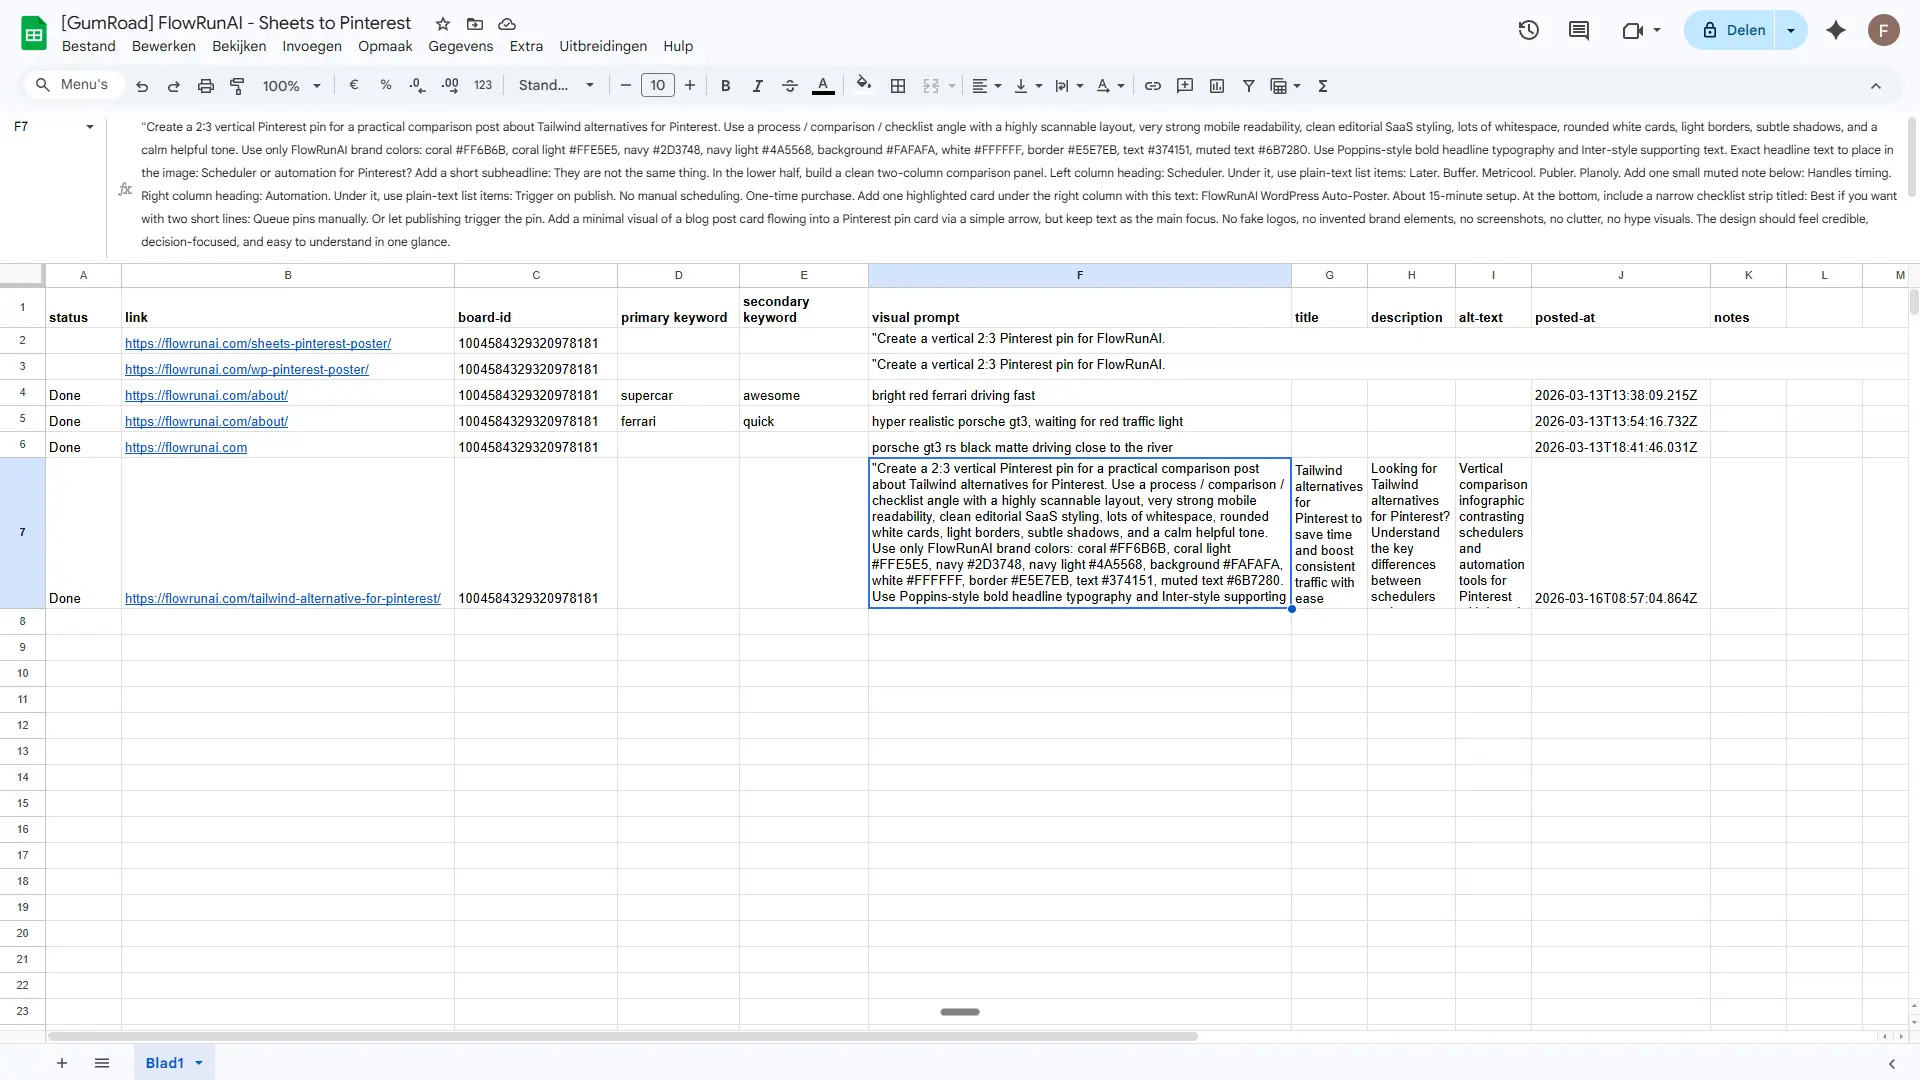
| visual prompt | The image generation instruction sent to OpenAI. Be specific — this drives the pin visual. |
| title | AI-generated pin title written to this column after generation. |
| description | AI-generated keyword-rich description with hashtags, written back to this column. |
| alt-text | AI-generated image alt text for accessibility. |
| posted-at | Timestamp written automatically after a successful post. |
| notes | Your own reference field. Not read by the automation. |
One important rule: do not rename columns after you have mapped them in Make.com. The blueprint references each column by name. Renaming breaks the mapping and stops the automation.
The Status Column — Your Anti-Duplicate Safety Net
The status column controls everything. It tells Make.com which rows to process and which to skip. There are three states:
- Blank — row is ready and will be picked up on the next run
- Done — pin was posted successfully and will never be processed again
- Error — something failed and the row needs your attention
Here is how a single row moves through the automation:
- Before run: Row 5 — Status = blank
- After post: Row 5 — Status = "Done", posted-at = 2026-03-28 18:00
- Next run: Row 5 — Status = "Done" — skipped by filter
The Google Sheets Update Row module writes "Done" and the timestamp directly after a successful post. If the run fails at any point, it writes "Error" instead.
This is the most commonly reported failure when people build this setup without a template. Without status tracking, every run reprocesses every row. That means duplicate pins posted to your board repeatedly, which Pinterest treats as spam behavior.
Formatting Rules That Keep Your Automation Running
Make.com reads your sheet exactly as it is. Small formatting issues can break a run silently. Keep these rules in place from the start:
- No merged cells — ever. Merged cells break row reading in Make.com.
- All column headers go in row 1 with no empty header cells in between.
- Use ISO 8601 date format (YYYY-MM-DD) in any date fields.
- Never rename a column after the automation has been mapped in Make.com.
Connecting Google Sheets to Pinterest (Step by Step)
How the Make.com Scenario Works
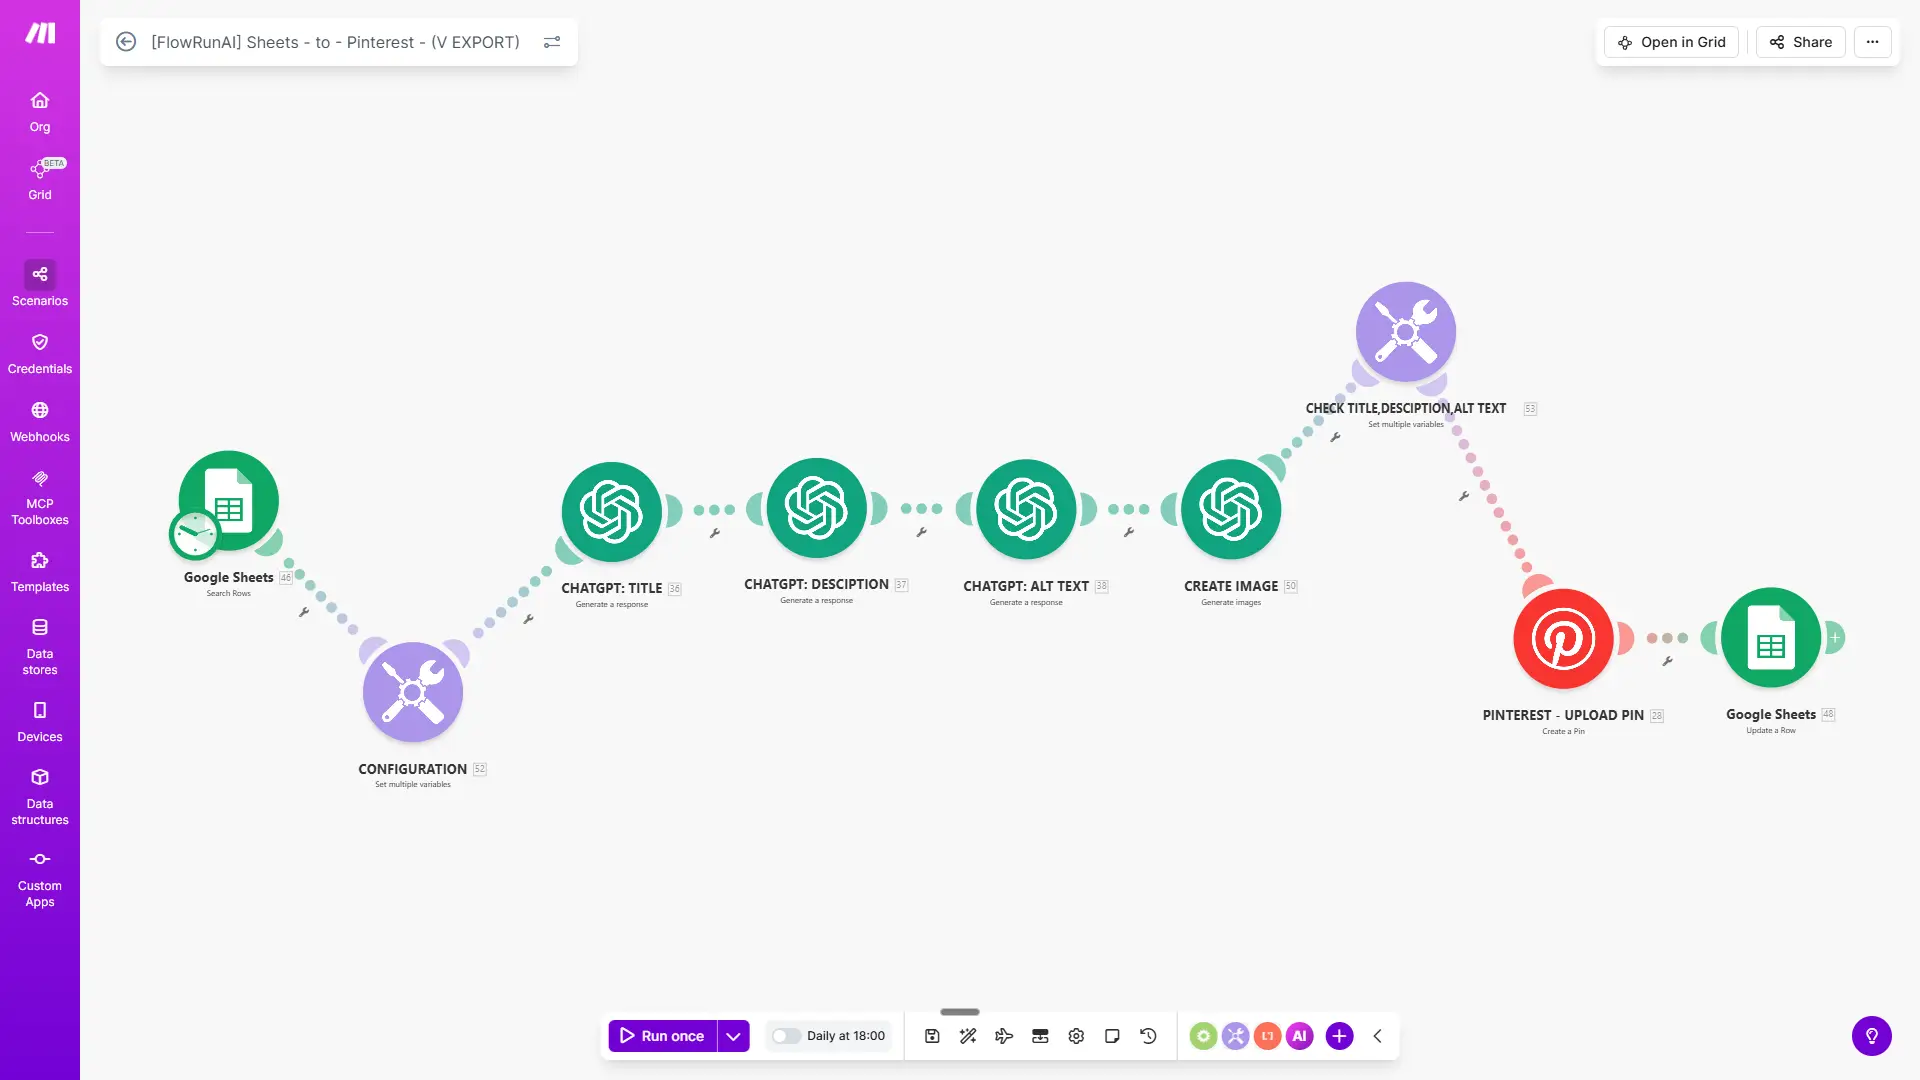
The automation runs once per day at a fixed time. It picks up one row from your sheet, builds the pin, posts it, and marks the row done. Here is what happens inside the scenario, module by module:
- Google Sheets: Search Rows — runs on the daily trigger and finds the first row where Status is blank.
- Configuration module — sets the variables for the current run, such as your board ID and prompt settings.
- ChatGPT: Title — generates a Pinterest-optimized pin title based on your primary keyword.
- ChatGPT: Description — generates a keyword-rich description with hashtags based on your primary and secondary keywords.
- ChatGPT: Alt Text — generates accessible alt text for the pin image.
- Create Image — sends your visual prompt to the OpenAI image API and generates a vertical 2:3 Pinterest image.
- Check Title / Description / Alt Text — validates the generated content before posting.
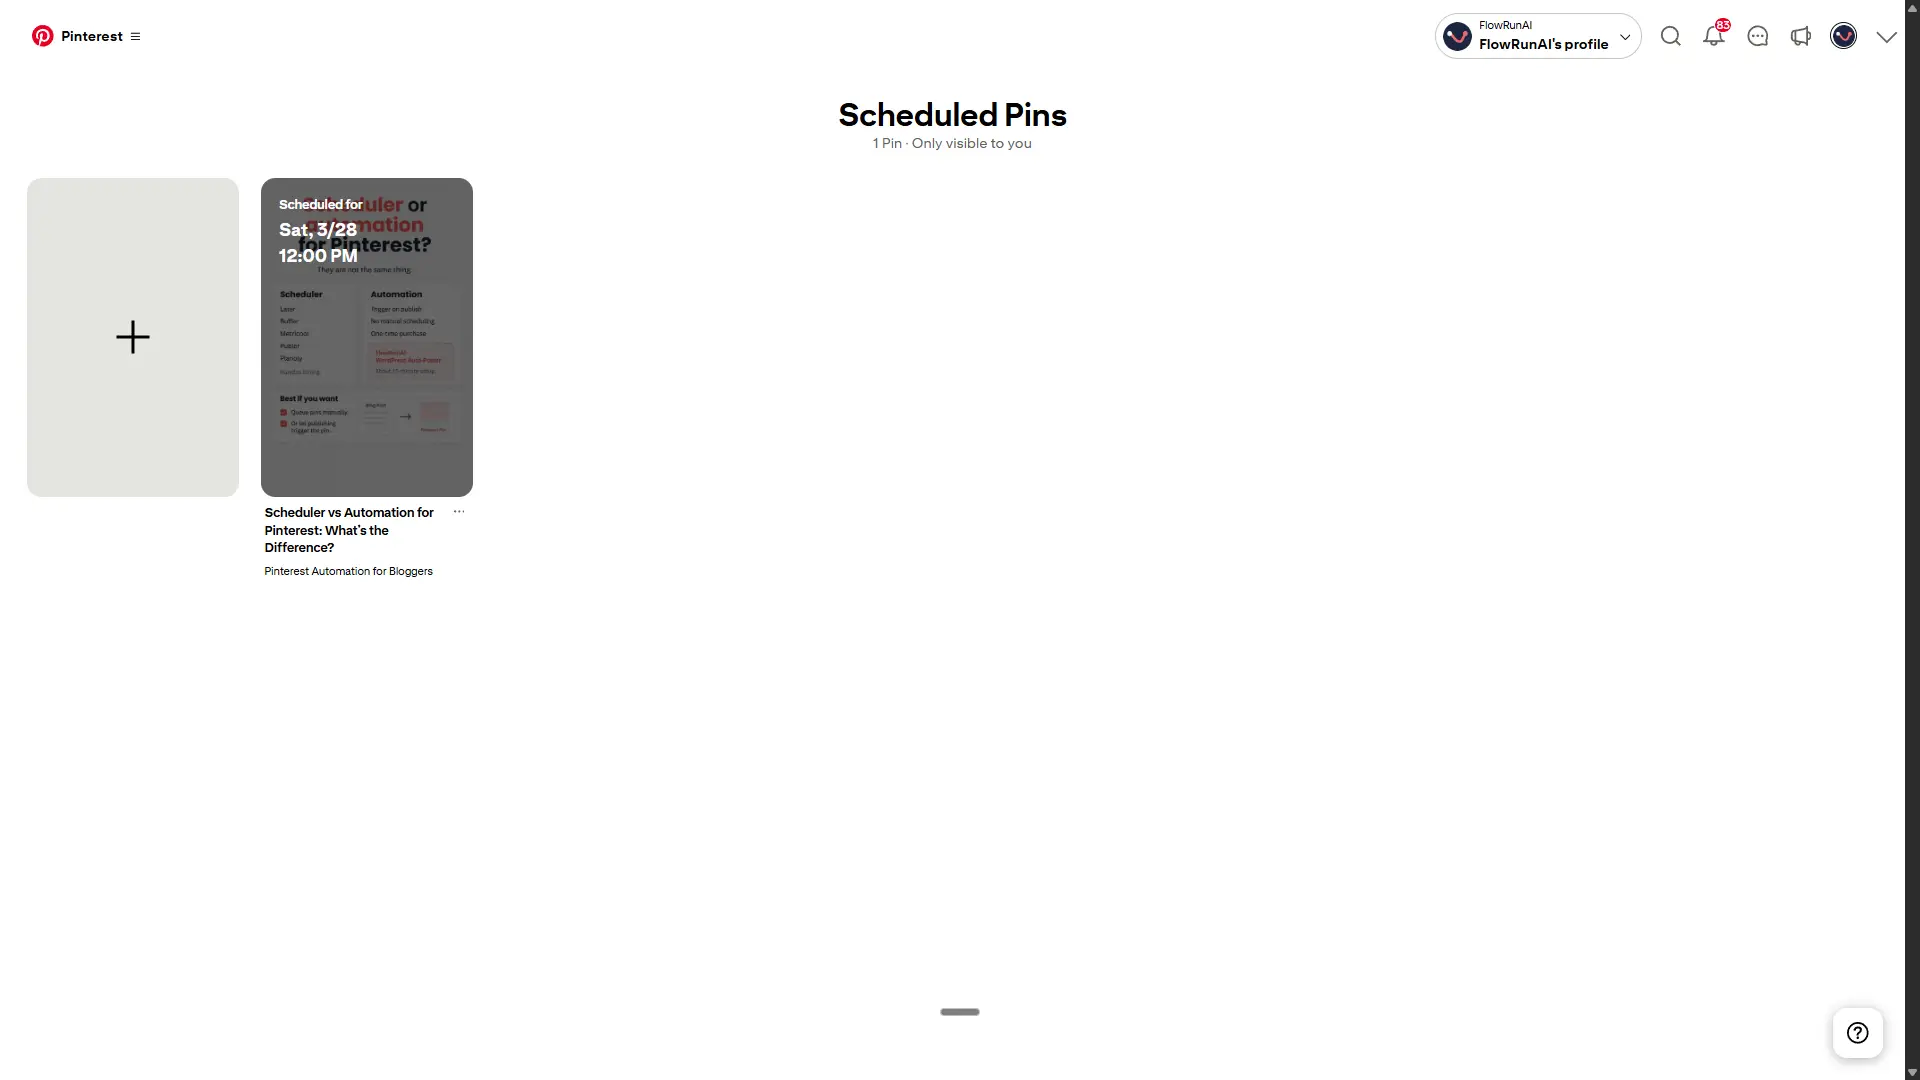
- Pinterest: Upload Pin — publishes the pin to the board specified in your sheet row.
- Google Sheets: Update Row — writes "Done" to the Status column and adds the posted-at timestamp.
The daily trigger is visible at the top of the scenario and set to a fixed time, for example Daily at 18:00. One row per run keeps the automation clean and your posting cadence consistent.
Setting the Daily Schedule
To set the trigger, open your scenario in Make.com and click the clock icon at the top left. Set the interval to Daily and choose your preferred time.
Once per day is the right setting for most users. It keeps your posting consistent, uses a low number of operations, and spaces your pins automatically without manual input. The Make.com free plan has a 15-minute minimum interval between runs, but that limit has no effect on a daily trigger.
Test With One Row First
Before activating the daily trigger, fill in one row with all required fields and click "Run once" in Make.com. Check the execution history to confirm all modules show green. Then open Pinterest and verify the pin is live.
Only activate the daily schedule after a successful test run. A misconfigured scenario with the trigger already active can process multiple rows at once before you catch the error.
Where Beginners Most Often Get Stuck
Most setup issues fall into one of four categories:
- OAuth token expires after roughly 30 days. Pinterest connections in Make.com need to be reconnected periodically. Open the Pinterest module, click the connection, and re-authenticate.
- Google Drive image URL fails. Drive share links return an HTML preview page, not the image file. Use a direct CDN URL or switch to the AI image generation option in the scenario.
- Make.com column visibility is too narrow. If the row range in your Google Sheets module does not cover all columns, later columns are hidden from the scenario. Check that the range extends to your last column.
- Board ID is wrong or missing. Use the dynamic board selector inside Make.com's Pinterest Create Pin module. It fetches all your boards and their numeric IDs automatically, so no manual lookup is needed.
Building this scenario from scratch takes 4 to 10 hours if you are new to Make.com. The Sheets to Pinterest AI Auto-Poster is a ready-to-import blueprint that most users have running in about 15 minutes.
How Often Should You Post? Frequency, Spacing, and Spam Prevention
Safe Posting Frequency for New vs. Established Accounts
How much you can post depends on how established your account is. Post too much too early and Pinterest's algorithm struggles to categorize your content. Here is a safe range by account age:
| Account Stage | Fresh Pins per Day | Notes |
|---|---|---|
| New account (0-3 months) | 1-3 pins/day | Build slowly. The algorithm needs time to categorize your niche. |
| Established account (3+ months) | 1-5 pins/day | Safe zone for most bloggers posting consistently. |
| High-volume accounts | 5-10 pins/day | Only sustainable if content is genuinely varied across pins. |
Pinterest does not publish an official maximum daily pin limit. These ranges reflect community consensus and expert guidance, not official Pinterest policy.
For a deeper breakdown of what consistency looks like at different growth stages, see the guide on how often to pin on Pinterest.
How to Space Pins Throughout the Day
Leave at least 30 to 60 minutes between pins. Two to three hours is a safer gap if your account is newer.
With a single daily Make.com trigger, spacing is handled automatically. One run posts one pin, and the next run does not fire until the next day. No extra configuration needed.
If you want to post more than once per day, set up two separate scenario runs at different times. For example, one trigger at 9:00 and another at 18:00. Keep them in the same sheet, using the same status column to prevent duplicates.
How to Post the Same URL Multiple Times Without Getting Flagged
You can pin the same destination URL more than once. Wait at least two to three days between pins pointing to the same URL, even if the image is different.
Vary the visual prompt and primary keyword on each row. This gives the AI enough variation to generate a genuinely different pin, not just a slightly adjusted version of the same one.
Use the notes column to track when a URL was last posted. A quick note like "posted 2026-03-28" takes five seconds and saves you from guessing later.
Troubleshooting: When Things Go Wrong
Most issues with this setup come down to one of four causes.
"Board Not Found" Error
This usually means the board reference in your scenario no longer matches an existing board. The board may have been renamed or deleted since the scenario was built.
Use the dynamic board selector inside Make.com's Pinterest Create Pin module. Click the board field, select Search, and Make.com fetches all your boards with their numeric IDs automatically. Never type a board name manually — even a small typo or name change breaks the connection.
Image URL Errors
Pinterest requires a direct link to the image file itself. The URL must end in .png, .jpg, or .mp4. Google Drive share links and Dropbox preview links both return an HTML page instead of the file, so they fail every time.
Re-host your image on a service that provides a direct public URL. Cloudinary's free tier works well for this. The simpler fix is to use the AI image generation option built into the blueprint and skip manual hosting entirely.
Duplicate Pins Being Posted
This happens when the Google Sheets Update Row module does not run after a partial failure. The Status column stays blank, so the next run picks up the same row again and posts a second pin.
Open Make.com's execution history and check whether the Update Row step ran on the failed execution. If it did not, add error handling to your scenario so the Update Row module fires even when an earlier module fails.
How to Find Your Pinterest Board ID
Use Make.com's dynamic board selector. Click the board field in the Pinterest Create Pin module, select Search, and Make.com retrieves all your boards with their numeric IDs automatically.
One important distinction: Pinterest's native CSV bulk upload uses the board's display name. Make.com's API connection uses the numeric board ID. Do not mix the two. If you are running both methods alongside each other, double-check which format each one requires.
What Changed Recently That Older Pinterest Tutorials Miss
The 10-Pin Queue — Not 100 Pins
A number of blogs still cite a 100-pin scheduling limit. That figure does not appear anywhere in current Pinterest documentation.
Pinterest's own help page at help.pinterest.com states a maximum of 10 pins scheduled in the future at one time. Verified March 2026.
The practical impact is significant. Post two pins per day and your queue is empty in five days. If you are relying on the native scheduler as your consistency strategy, you are refilling it every week. That is the problem this setup solves.
30-Day Scheduling — Not Two Weeks
Older tutorials and blog posts commonly cite two weeks as the maximum scheduling window. The current limit is 30 days. The calendar inside Pinterest greys out any date beyond that point.
Verified on help.pinterest.com, March 2026. If a tutorial tells you to plan no further than two weeks ahead, it is working from outdated information.
Why Idea Pins Tutorials Are Outdated
Idea Pins no longer exist as a separate format. Pinterest merged them into standard Pins. Any tutorial that walks you through creating an "Idea Pin" as a distinct content type is describing a workflow that is no longer available. Skip those guides entirely.
Frequently Asked Questions
How many pins can I schedule on Pinterest at once?
Pinterest's native scheduler lets you have up to 10 pins scheduled at one time, each up to 30 days in advance. For anyone posting two or more pins a day, that queue runs out within a week.
Do I need a Pinterest Business account to schedule pins?
Yes. Native scheduling and all automation workflows require a Business account. Switching from personal to business is free and takes under two minutes. No existing content is affected by the switch.
Is automated pinning allowed by Pinterest?
Yes. Pinterest officially supports third-party automation through its API and actively promotes API-connected platforms including Tailwind, Buffer, and Canva in its creator guidance. Posting via an approved automation workflow is within Pinterest's terms of service, as long as you post at a normal frequency and avoid duplicate content.
What's the difference between Pinterest's bulk CSV upload and a Google Sheets automation?
Pinterest's bulk CSV lets you upload up to 200 pins at once, but it is a manual operation you repeat every time the batch runs out. A Google Sheets automation is an ongoing queue: it posts your next pin every day without you touching anything.
Do I need to know how to code to set this up?
No. Make.com is fully visual. You connect modules and fill in fields without writing any code. Connecting Pinterest takes about 30 seconds via a standard login flow.
How many pins per day should I post to avoid Pinterest's spam filter?
For most bloggers, 1 to 3 fresh pins per day is the safe zone. Space pins at least 30 to 60 minutes apart, and wait 2 to 3 days before pinning the same URL again, even with a different image. Pinterest does not publish an official daily limit. These are community guidelines.
Does this Google Sheets workflow work without WordPress?
Yes, completely. The workflow has zero WordPress dependency. Your images need to be at a publicly accessible direct URL, or you can use the AI image generation option in the setup, which handles hosting automatically.